Primary Color Controls
OpenRV Web provides primary color controls for real-time grading in the browser. These controls operate on scene-referred linear light values within the GPU fragment shader, producing mathematically correct results across the full dynamic range of the source material.
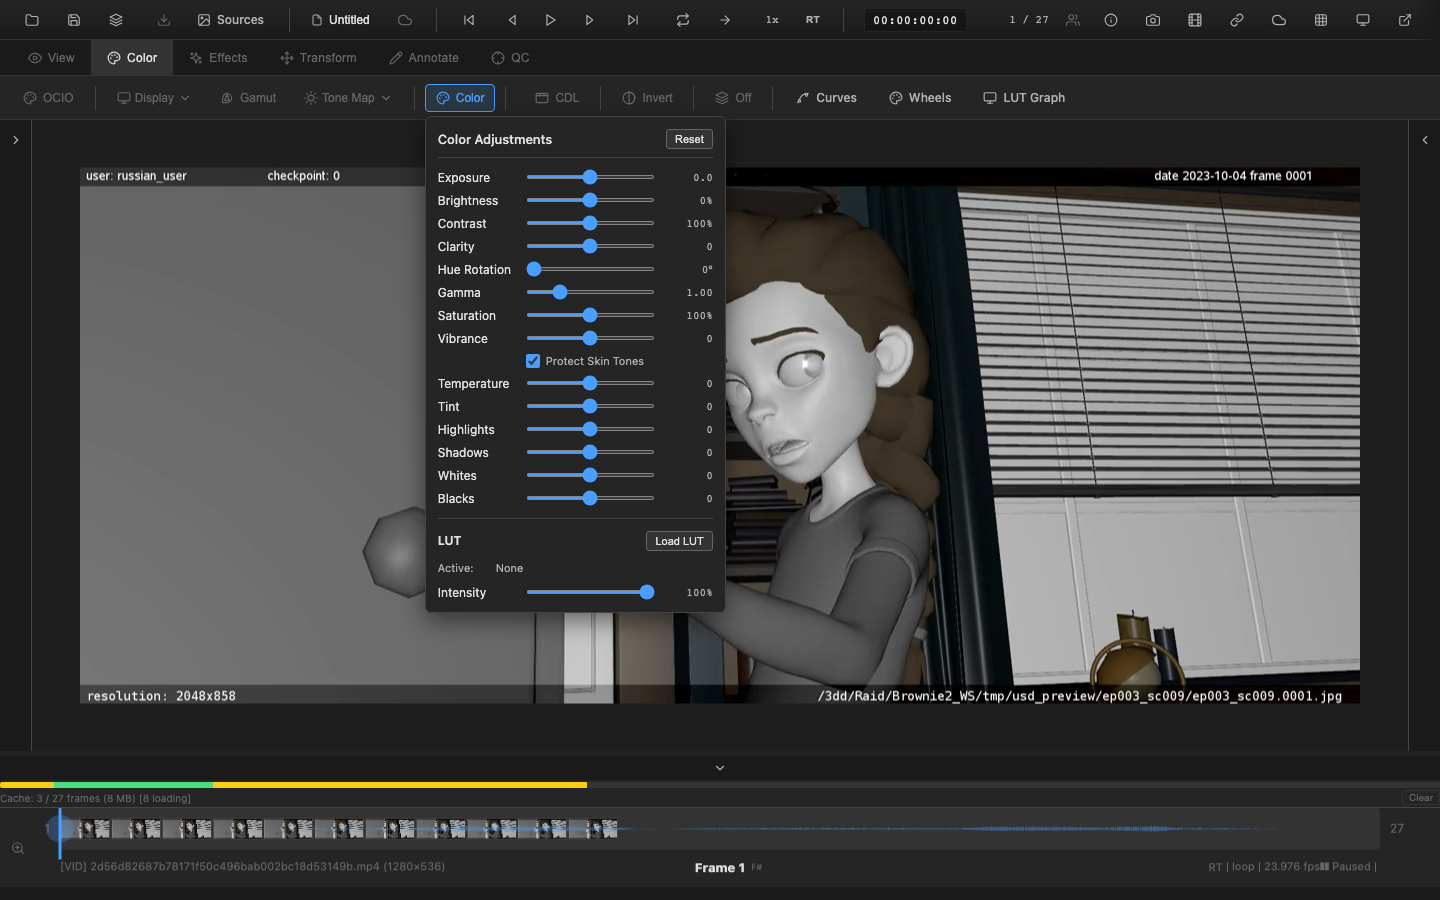
Opening the Color Panel
Press C to toggle the color controls panel, or navigate to the Color tab (key 2) and click the Color button. The panel appears as a floating dropdown with all adjustment sliders. Press Escape to close.
Available Controls
Exposure
| Property | Value |
|---|---|
| Range | -5 to +5 stops |
| Default | 0 |
| Formula | pixel * 2^exposure |
Exposure adjusts overall image brightness using the same stop-based system as a camera. Each full stop doubles (+1) or halves (-1) the light reaching the sensor. The adjustment is applied per-channel in linear light, making it the most physically accurate way to brighten or darken an image.
Exposure is the first color adjustment in the pipeline, applied immediately after input linearization and primaries conversion. This position ensures all subsequent adjustments operate on correctly exposed linear data.
Typical uses:
- Match brightness between shots in a sequence
- Compensate for under- or over-exposed source material
- Preview how an image looks at different exposure levels before committing to a grade
Interaction with other controls: Because exposure is multiplicative and operates in linear light, it preserves the relative relationships between pixel values. A +2 stop exposure boost followed by a -2 stop reduction returns the image to its original state with no rounding error. This is not true of brightness (additive) or gamma (non-linear), which is why exposure is the preferred control for overall brightness matching.
Gamma
| Property | Value |
|---|---|
| Range | 0.1 to 4.0 |
| Default | 1.0 |
| Formula | pow(pixel, 1.0 / gamma) |
Gamma applies a power function to the image data. Values below 1.0 darken the image (crushing shadows), while values above 1.0 lift the midtones without clipping highlights. Unlike exposure, gamma is a non-linear adjustment that primarily affects midtones.
In the pipeline, gamma is applied after the display transfer function and before the display gamma override. This placement makes it function as a creative per-channel gamma control rather than a display calibration tool.
Contrast
| Property | Value |
|---|---|
| Range | 0 to 200% (0.0 to 2.0) |
| Default | 100% (1.0) |
| Formula | (pixel - 0.5) * contrast + 0.5 |
Contrast scales the difference between each pixel and the midpoint (0.5). Increasing contrast pushes dark values darker and bright values brighter. Decreasing contrast compresses the tonal range toward the midpoint, producing a flatter image.
The contrast control supports per-channel operation. The pivot point of 0.5 in linear space provides a neutral balance between shadows and highlights.
Practical guidance: For general-purpose contrast enhancement, values between 110% and 140% work well for most footage. For a flat, log-like starting point suitable for heavy grading, reduce contrast to 60-80%. Combining contrast with the S-Curve preset in the curves editor provides finer control over the shape of the contrast adjustment.
Saturation
| Property | Value |
|---|---|
| Range | 0 to 200% (0.0 to 2.0) |
| Default | 100% (1.0) |
| Formula | mix(luma, pixel, saturation) |
Saturation controls the intensity of color in the image. At 0%, the image is fully desaturated (grayscale). At 100%, colors are unchanged. Values above 100% boost color intensity.
The desaturation uses Rec. 709 luminance weights (0.2126 R, 0.7152 G, 0.0722 B) to compute a perceptually weighted grayscale value, ensuring that the desaturated image maintains correct relative brightness.
Brightness
| Property | Value |
|---|---|
| Range | -100% to +100% (-1.0 to +1.0) |
| Default | 0% (0.0) |
| Formula | pixel + brightness |
Brightness adds a constant offset to all channels. Unlike exposure (which multiplies), brightness shifts the entire tonal range up or down. This lifts or lowers blacks, which can be useful for matching black levels between different sources but can also clip shadow detail.
When to use brightness vs exposure: Use exposure when the entire image needs to be brighter or darker while maintaining the same black level (blacks stay at zero). Use brightness when the black level itself needs to shift -- for example, lifting blacks to simulate lens flare haze, or lowering blacks to compensate for a monitor that does not reach true black.
Temperature
| Property | Value |
|---|---|
| Range | -100 to +100 |
| Default | 0 |
Temperature shifts the color balance along the blue-to-yellow axis, simulating the effect of shooting under warmer or cooler lighting conditions. Negative values add blue (cooler), positive values add warmth (yellow/orange).
The implementation applies independent gain adjustments to the red and blue channels while preserving the green channel, maintaining overall luminance balance.
Common values: A temperature of -30 to -50 compensates for tungsten lighting (3200K). A temperature of +20 to +40 warms up daylight-balanced footage for a golden hour look. For precise white balance, use the pixel probe (Shift+I) to read the RGB values of a known neutral surface, then adjust temperature and tint until all three channels are equal on that surface.
Tint
| Property | Value |
|---|---|
| Range | -100 to +100 |
| Default | 0 |
Tint shifts the color balance along the green-to-magenta axis, complementing the temperature control. Negative values add green; positive values add magenta. Together, temperature and tint provide full white balance adjustment for any lighting condition.
Vibrance
| Property | Value |
|---|---|
| Range | -100 to +100 |
| Default | 0 |
Vibrance is an intelligent saturation control that boosts less-saturated colors more aggressively than already-saturated colors. This produces more natural results than uniform saturation adjustment, especially in images with mixed color intensities.
Skin tone protection: When the skin protection checkbox is enabled, vibrance reduces its effect on hues in the 20-50 degree range (warm skin tones) with saturation below 60% and luminance between 20% and 80%. This prevents faces from becoming unnaturally vivid when boosting overall color intensity.
The vibrance algorithm works in HSL space:
- Compute a saturation factor: less-saturated pixels receive a stronger adjustment.
- Apply an optional skin tone protection mask based on hue, saturation, and luminance.
- Adjust the saturation channel by the computed amount.
Clarity
| Property | Value |
|---|---|
| Range | -100 to +100 |
| Default | 0 |
Clarity enhances local contrast in the midtones using a high-pass filtering technique. It makes textures and fine details appear sharper and more defined without affecting overall exposure or global contrast.
The algorithm:
- Compute a 5x5 Gaussian blur of the source image to extract the low-frequency component.
- Subtract the blur from the original to isolate high-frequency detail.
- Apply a midtone mask based on luminance so the effect is strongest at mid-brightness and fades near pure black or white.
- Add the masked high-frequency detail back to the image, scaled by the clarity amount.
Positive values increase local contrast (punchier midtones). Negative values decrease local contrast (softer, more diffused look).
Float-precision midtone mask
The clarity midtone mask is computed in float precision using the smooth formula 1 - (|n - 0.5| * 2)^2, where n is the normalized luminance. Earlier versions of the CPU paths sampled a 256-entry uint8-quantized lookup table indexed by Math.round(luminance), which produced visible plateaus and banding on smooth gradients -- particularly noticeable in HDR / float pipelines where input precision exceeds 8 bits. Replacing the LUT with the float formula reduces the plateau count on a 1024-sample sweep from 769 to 1 (the mathematical peak at n = 0.5), giving smoother midtone enhancement on subtle gradients. The shared helper computeMidtoneMaskValue in src/utils/effects/effectProcessing.shared.ts is used (or formula-inlined verbatim) by the worker, the synchronous EffectProcessor, and the ViewerEffects path consumed by ClarityNode, so all three CPU paths stay bit-for-bit consistent.
Sampling Note (single-pass renderer)
Clarity's 5x5 Gaussian blur kernel samples the input texture (the linearized source pixels), not a post-color-pipeline buffer. This is intentional in the single-pass GLSL renderer: routing intermediate pipeline colors back through a texture for neighbour sampling would require a second render pass and an additional FBO. The visual consequence is that clarity operates on the input encoding (linear with input primaries) rather than on display-referred values. For unsharp-mask-style edge enhancement this is acceptable -- local high-frequency detail dominates the effect and survives the linear pipeline well. HDR users on heavily-graded scenes may notice a small expected difference between the GPU path (input-referred sample) and the CPU fallback path (which operates on the post-color buffer). If a true post-pipeline sample is required, the WebGPU multi-pass spatialEffects stage provides it.
Highlights
| Property | Value |
|---|---|
| Range | -100 to +100 |
| Default | 0 |
Highlights recovery targets the bright regions of the image. Positive values darken highlights (recovering detail from near-clipped areas), while negative values brighten highlights further.
The control uses a smooth luminance mask (smoothstep(0.5, 1.0, luminance)) to isolate the highlight region. The adjustment is HDR-aware: it scales with the hdrHeadroom value to maintain correct behavior with high dynamic range content.
Shadows
| Property | Value |
|---|---|
| Range | -100 to +100 |
| Default | 0 |
Shadows recovery targets the dark regions of the image. Positive values brighten shadows (revealing detail in underexposed areas), while negative values crush shadows further.
The control uses a complementary luminance mask (1.0 - smoothstep(0.0, 0.5, luminance)) to isolate the shadow region. Like highlights, it is HDR-aware and scales with the headroom value.
Whites
| Property | Value |
|---|---|
| Range | -100 to +100 |
| Default | 0 |
Whites adjusts the white clipping point. Positive values lower the white point (compressing highlights), while negative values raise it (expanding the highlight range). This control operates as a clipping-style adjustment, distinct from the soft-knee highlights recovery.
Blacks
| Property | Value |
|---|---|
| Range | -100 to +100 |
| Default | 0 |
Blacks adjusts the black clipping point. Positive values raise the black point (lifting crushed shadows into visible range), while negative values lower it (expanding the shadow range). Used in combination with whites, these controls define the effective dynamic range of the displayed image.
Whites and blacks together: These two controls act as a remapping of the output range. Setting whites to +20 and blacks to +10 compresses the dynamic range, useful for creating a faded, low-contrast look. Setting whites to -10 and blacks to -10 expands the range, increasing overall contrast. For precise control, use these in combination with the histogram scope to verify that the tonal distribution fills the desired output range without clipping.
VFX Use Case
During dailies review, exposure and contrast are the most-used primary controls. A quick exposure bump of +0.5 to +1.0 stops can reveal shadow detail in underexposed plates, while a contrast boost to 120-130% helps evaluate whether a shot will cut well with adjacent shots. These adjustments are non-destructive and apply only in the viewer -- they do not modify the source media, making them safe for review sessions with supervisors and clients.
Pipeline Note
Temperature and tint controls are invaluable for evaluating white balance consistency across a sequence. During dailies, if shots were captured under mixed lighting (practical tungsten + daylight), use the pixel probe (Shift+I) on a known neutral surface and adjust temperature/tint to match across shots before presenting to the director.
Processing Order
All primary color adjustments execute within a single-pass GPU fragment shader. The precise ordering determines how adjustments interact:
- Input EOTF -- linearize source data (sRGB, HLG, PQ, log curves)
- File LUT / Input primaries -- source color space conversion
- Exposure -- multiplicative, in linear light
- Per-channel scale/offset -- additional linear corrections
- Temperature / Tint -- white balance
- Brightness -- additive offset
- Contrast -- scale around midpoint
- Saturation -- mix with luminance
- Highlights / Shadows / Whites / Blacks -- tonal recovery
- Vibrance -- intelligent saturation boost
- Hue rotation -- luminance-preserving matrix
- Clarity -- local contrast via high-pass filter
- Color Wheels / CDL / Curves -- additional grading stages
- Tone mapping -- HDR to display range
- Display transfer / Gamma -- output encoding
This ordering ensures that exposure and white balance operate on linear data, saturation and contrast interact correctly, and recovery controls have access to the full graded tonal range before creative grading stages.
For the complete ~40-stage pipeline breakdown, see Rendering Pipeline.
Resetting Controls
- Reset All: Click the Reset button in the color controls panel header to restore every slider to its default value.
- Reset Individual: Double-click any slider to reset that single control to its default.
- Keyboard: Press
Cto toggle the panel, then use the reset controls.
All resets take effect immediately and are reflected in the real-time viewport.
Control Summary Table
| Control | Range | Default | Type | Pipeline Stage |
|---|---|---|---|---|
| Exposure | -5 to +5 stops | 0 | Multiplicative | 1 (linear light) |
| Gamma | 0.1 to 4.0 | 1.0 | Power function | 8b (after display transfer) |
| Contrast | 0% to 200% | 100% | Pivot scale | 4 (linear light) |
| Saturation | 0% to 200% | 100% | Luminance mix | 5 (linear light) |
| Brightness | -100% to +100% | 0% | Additive offset | 3 (linear light) |
| Temperature | -100 to +100 | 0 | Channel gain | 2 (linear light) |
| Tint | -100 to +100 | 0 | Channel gain | 2 (linear light) |
| Vibrance | -100 to +100 | 0 | HSL saturation | 5c (linear light) |
| Clarity | -100 to +100 | 0 | High-pass blend | 5e (linear light) |
| Highlights | -100 to +100 | 0 | Masked offset | 5b (linear light) |
| Shadows | -100 to +100 | 0 | Masked offset | 5b (linear light) |
| Whites | -100 to +100 | 0 | Clipping remap | 5b (linear light) |
| Blacks | -100 to +100 | 0 | Clipping remap | 5b (linear light) |
Scripting API
Color adjustments are accessible through the scripting API:
// Set exposure to +1.5 stops
window.openrv.color.setAdjustments({ exposure: 1.5 });

// Get current adjustments
const adj = window.openrv.color.getAdjustments();
console.log(adj.exposure); // 1.5

// Reset all adjustments
window.openrv.color.reset();
Related Pages
- Rendering Pipeline -- full shader pipeline stage ordering
- CDL Workflow -- ASC CDL color correction
- Curves Editor -- spline-based tonal adjustments
- Color Wheels -- lift/gamma/gain three-way correction
- Tone Mapping -- HDR tone mapping operators
- Display Profiles -- display transfer functions and output configuration