Overlays and Guides
OpenRV Web includes visual overlays and guide systems that display metadata, safety zones, diagnostic information, and production graphics on top of the viewed image. Overlays are non-destructive and render independently of the source media. All overlay settings are saved with the session state.
Timecode Overlay
The timecode overlay displays the current frame position in SMPTE timecode format (HH:MM:SS:FF) on the viewer canvas.
Display Options
- Position: Top-left, top-right, bottom-left, or bottom-right corner of the viewer
- Display format: Configurable via the
displayFormatsetting:- SMPTE Timecode (
smpte): Shows only the SMPTE timecode (HH:MM:SS:FF). This is the default. - Frame Number (
frame): Shows only the frame number (e.g. "Frame 42 / 100"). - Both (
both): Shows both SMPTE timecode and frame number.
- SMPTE Timecode (
- Background: Semi-transparent background box for readability against any image content
- Font size: Small, medium, or large
The display format can be changed from the right-click settings menu on the timecode overlay button in the View tab toolbar.
The timecode is derived from the current frame number and the session frame rate. For sources with embedded timecode metadata (e.g. MXF files with a start timecode), the source timecode is displayed in a separate row below the session timecode. This can be toggled via the "Show Source Timecode" checkbox in the right-click settings menu.
Toggle the timecode overlay from its dedicated button in the View tab toolbar (keyboard shortcut: Alt+Shift+T). Right-click the button to access display settings.
Safe Areas
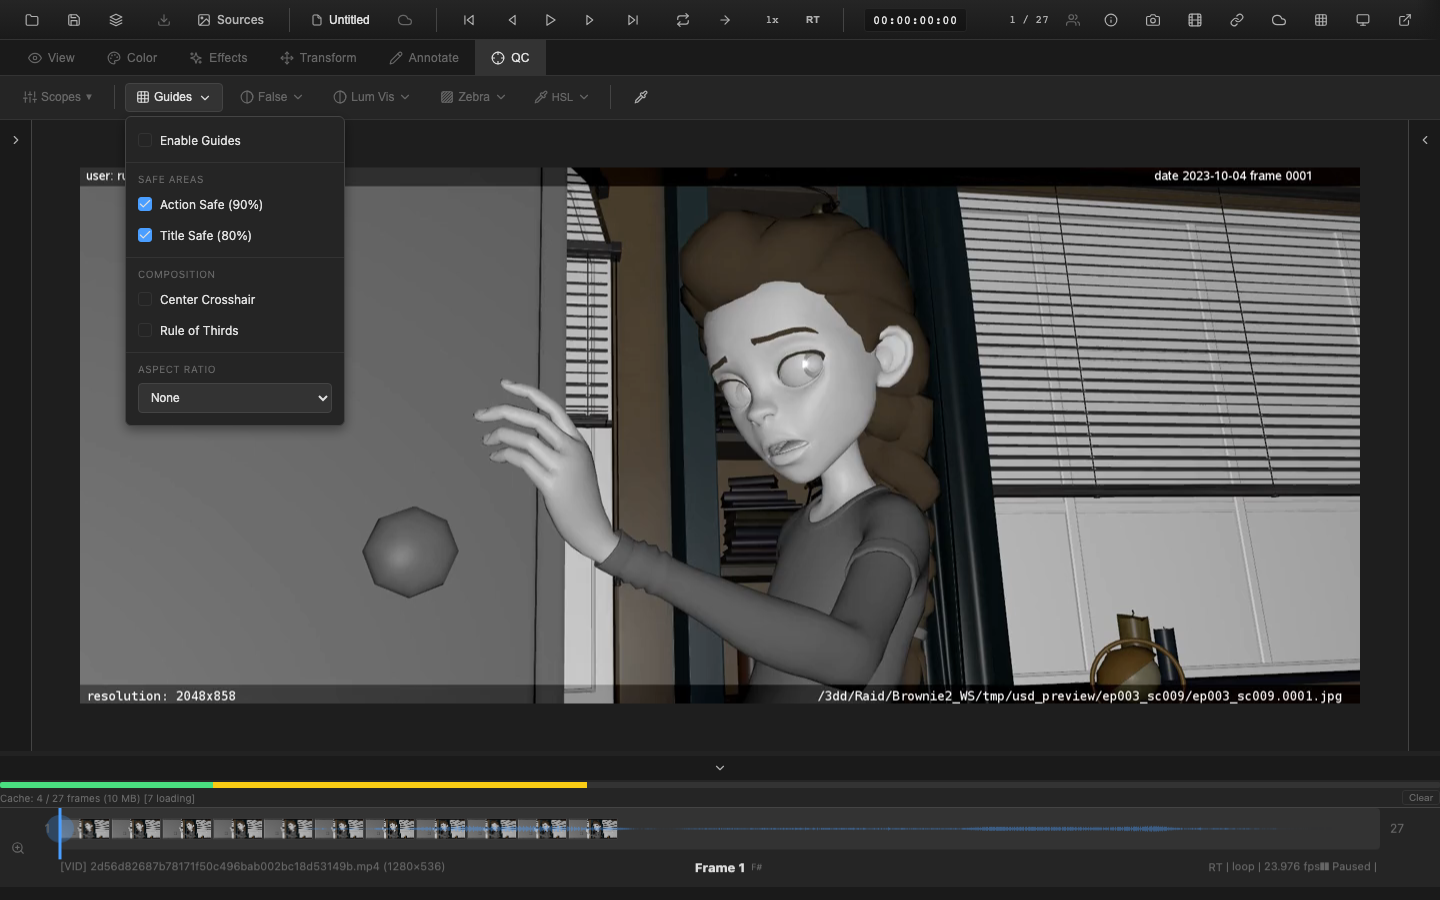
Safe area overlays mark the broadcast-safe and title-safe regions of the frame, following industry standards for television and streaming delivery.
Standard Safe Areas
| Zone | Percentage | Default Color | Purpose |
|---|---|---|---|
| Action safe | 93% | White | All important action must fall within this area to avoid being cut off by consumer displays |
| Title safe | 90% | Green | All text and graphics must fall within this area for legibility on edge-cropping displays |
| Custom | User-defined (1-99%) | Orange | Specify any percentage for production-specific safe zones |
Display
Safe areas are rendered as semi-transparent bordered rectangles centered on the frame. The border color and opacity are configurable via the Appearance section of the safe areas dropdown. When multiple safe zones are active simultaneously, each uses a distinct color for clarity: white for action safe, green for title safe, and orange for custom. When only a single zone is active, it uses the user-configured guide color instead.
Custom Safe Area
The custom safe area allows specifying any percentage between 1% and 99%. Enable "Custom Safe Area" in the safe areas dropdown, then enter the desired percentage in the input field that appears. This is useful for production-specific safe zones that differ from the standard SMPTE title/action safe areas.
Safe area overlays respect the current crop settings. When crop is active with a non-full crop region, all safe area guides (title safe, action safe, aspect ratio, center crosshair, and rule of thirds) are calculated relative to the cropped region rather than the full image. When crop is disabled or the crop region covers the full frame, guides revert to full-display positioning.
Clipping Overlay
The clipping overlay highlights pixels that are at or beyond the minimum (0.0, pure black) or maximum (1.0, pure white) values. Clipped regions are displayed as colored overlays:
- Shadow clipping: Pixels at 0.0 are overlaid in blue, indicating crushed blacks
- Highlight clipping: Pixels at 1.0 are overlaid in red, indicating blown-out highlights
- Both clipping: Pixels that clip in all channels simultaneously receive a distinct highlight
The clipping overlay operates on the post-correction image (after exposure, contrast, and other color adjustments), making it useful for evaluating whether a grade is pushing values into clipping.
Threshold Configuration
The clipping thresholds can be adjusted from their default 0.0/1.0 positions. For example, setting the highlight threshold to 0.95 will flag pixels that are approaching but not yet at full white, providing an early warning before values clip.
Missing Frame Indicator
When an image sequence has gaps (missing frame numbers), the missing frame indicator helps users identify and handle those gaps. The View tab toolbar exposes a Missing Frame Mode dropdown with four modes:
Modes
| Mode | UI Label | Internal Value | Behavior |
|---|---|---|---|
| Off | Off | off | No missing-frame indication. Gaps are ignored and the viewer draws whatever is available (or nothing). |
| Frame (default) | Frame | show-frame | The current source frame continues to render in the viewer while a centered warning icon and "MISSING FRAME" label with the frame number are shown as a semi-transparent overlay on top. This is the default mode. |
| Hold | Hold | hold | The nearest available preceding frame is displayed in place of the missing frame, so the viewer always shows real image content. The overlay is not shown. |
| Black | Black | black | The viewer content is replaced entirely with a black frame. The overlay is not shown. |
Overlay Appearance
When the mode is Frame (the default), the overlay consists of:
- A warning icon (triangle with exclamation mark) rendered in red, centered in the viewer
- A "MISSING FRAME" label in red uppercase text below the icon
- The frame number (e.g. "Frame 42") displayed below the label in muted text
- A semi-transparent dark background (75% opacity black) covering the viewer area
The overlay is non-interactive (pointer events pass through to the viewer).
Timeline Markers
The timeline highlights each missing-frame position with a thin red vertical line and a semi-transparent red region on the track bar, so gaps are visible at a glance even when scrubbing. Timeline markers appear regardless of which missing-frame mode is selected.
Missing frame detection is automatic for image sequences and requires no manual configuration. The selected mode is persisted in local storage across sessions.
EXR Data/Display Window
EXR images can have different data windows and display windows. The data window defines the rectangle of actual pixel data; the display window defines the intended viewing rectangle.
When the data window differs from the display window, this overlay draws:
- A blue rectangle marking the data window boundary
- A yellow rectangle marking the display window boundary
- Semi-transparent fill in the region between the two windows
This is particularly useful when reviewing overscan content, partial renders, or multi-pass compositing where different elements have different data extents.
The EXR window overlay is enabled from its dedicated button in the View tab toolbar. Right-click the button to access settings. The overlay activates automatically when an EXR file with mismatched data/display windows is detected.
Matte Overlay
The matte overlay applies an opaque or semi-transparent mask to simulate a delivery aspect ratio without permanently cropping the image. This differs from the crop tool in that the matte overlay always shows the full image with darkened regions, whereas crop can hide the masked content entirely.
Controls
- Aspect ratio: Select from standard presets (2.39:1, 1.85:1, 16:9, 4:3, 1:1) or enter a custom ratio
- Opacity: Control the darkness of the matte region, from fully transparent (0%) to fully opaque (100%)
- Center point: Offset the matte from the image center for asymmetric framing evaluation
The matte overlay is toggled from its dedicated button in the View tab toolbar. Right-click the button to access settings. It can also be configured via the scripting API:
// Enable matte with 2.39:1 aspect and 80% opacity
openrv.view.setMatte({ aspect: 2.39, opacity: 0.8 });

// Query current matte settings
const matte = openrv.view.getMatte();
console.log(matte.aspect, matte.opacity, matte.show);

// Disable the matte overlay
openrv.view.clearMatte();
Matte settings persist when changing frames and are saved with the session state.
Bug Overlay
The bug overlay places a small, persistent logo or graphic element in a corner of the frame. In broadcast and streaming workflows, this is commonly used for:
- Network logos ("bugs") that must remain visible at all times
- Production company watermarks for internal review copies
- Rating or classification badges
Configuration
- Image: Upload a PNG or SVG file for the bug graphic
- Position: Any corner of the frame (top-left, top-right, bottom-left, bottom-right)
- Size: Scale relative to the frame dimensions
- Opacity: Control transparency for subtle watermarking
When a bug overlay is enabled and has an image loaded, it is automatically composited (burned) into each frame during video and image export. The exported logo matches the viewer's configured position, size, opacity, and margin. The bug overlay is drawn after annotations but before frameburn text, so timecode and metadata overlays remain readable on top of the logo.
Watermark Overlay
The watermark overlay places a single image at a chosen position on the frame. This is used for:
- Marking review copies with a logo or badge
- Adding recipient identification to distributed media
- Deterring unauthorized distribution of pre-release content
Controls
- Image: Upload a PNG, JPEG, WebP, or SVG file for the watermark graphic
- Position: Nine preset positions on a 3x3 grid (top-left through bottom-right) or a custom X/Y coordinate
- Scale: Resize the image relative to its original dimensions (10%-200%)
- Opacity: Control transparency (0-100%)
- Margin: Pixel offset from the frame edge when using a preset position
The watermark renders as an overlay and does not modify the source image. For permanent watermarking, use the frameburn feature during video export.
Perspective Grid
The perspective grid overlay is a perspective-correction mesh used for verifying and adjusting perspective distortion in the viewed image. It is not a composition guide — for rule-of-thirds, center crosshair, and aspect-ratio guides, see Safe Areas.
How It Works
The overlay draws an 8x8 subdivision grid that is mapped to four draggable corner handles. Dragging any corner repositions the grid lines to follow a perspective transform, allowing you to visually align the grid with vanishing points and architectural lines in the image.
Controls
- Corner handles: Four circular handles at each corner of the grid. Drag a handle to warp the grid into the desired perspective
- Grid lines: Fixed 8x8 subdivision mesh rendered in a light blue color
- Enable/disable: The overlay can be toggled on or off; when disabled the grid and handles are hidden
The perspective grid overlay emits a cornersChanged event whenever a handle is moved, which feeds into the perspective-correction transform pipeline.
Note Overlay
The note overlay draws colored bars on the timeline canvas to indicate frame ranges that have review notes. It is a timeline-level feature, not a viewer overlay.
Display
- Each note is rendered as a thin horizontal bar just below the timeline track
- Bars are color-coded by status: amber for open, green for resolved, gray for won't-fix
- Bar width corresponds to the note's frame range; single-frame notes have a minimum width of 2px for visibility
- Only top-level notes are shown (replies are excluded)
- Only notes matching the current source index are drawn
The note overlay listens for notesChanged events on the session and triggers a timeline redraw when notes are added, updated, or removed.
Spotlight Overlay
The spotlight overlay highlights a region of interest while dimming the surrounding area. It is useful during review sessions to draw attention to a specific part of the frame.
Shape
The spotlight supports two shapes:
- Circle: A circular highlight with uniform radius. Resize handles appear at the four cardinal points (N, S, E, W).
- Rectangle: A rectangular highlight with independent width and height. Resize handles appear at all eight positions (four corners and four edge midpoints).
Interaction
- Drag to position: Click inside the spotlight region and drag to move it. The cursor changes to a move icon.
- Resize: Click and drag any resize handle to change the spotlight size. The cursor changes to the appropriate resize direction (e.g.,
ns-resize,nwse-resize). - Position and size use normalized 0--1 coordinates relative to the image dimensions.
Controls
| Setting | Range | Default | Description |
|---|---|---|---|
| Dim amount | 0--1 | 0.7 | How dark the area outside the spotlight becomes. 0 = no dimming, 1 = fully black. |
| Feather | 0--0.5 | 0.05 | How soft the edge transition is. 0 = hard edge, higher values = smoother gradient. |
| Shape | circle / rectangle | circle | The shape of the highlighted region. |
The spotlight outline is drawn as a dashed white line (50% opacity) for visual feedback. The overlay is toggled from its dedicated button in the View tab toolbar.
Info Strip Overlay
The info strip overlay displays a semi-transparent bar at the bottom of the viewer showing the current source filename. It provides at-a-glance identification of which file is loaded.
Display
- Basename mode (default): Shows only the filename (e.g.,
shot_010_comp_v03.exr) - Full path mode: Shows the complete URL or file path, with right-to-left truncation so the filename end remains visible when the path is long
Toggle between modes by clicking the toggle icon button on the right side of the strip, or by pressing Shift+F7.
Settings
| Setting | Default | Description |
|---|---|---|
| Background opacity | 0.5 | Controls the darkness of the strip background (0 = transparent, 1 = fully opaque) |
The strip uses a monospace font (SF Mono / Fira Code / Consolas) with a text shadow for readability against any image content. Toggle visibility with F7 (matching desktop OpenRV). The overlay passes pointer events through to the viewer canvas so it does not interfere with interaction.
FPS Indicator
The FPS indicator is a heads-up display that shows real-time playback performance metrics on the viewer canvas. It appears automatically during playback and hides 2 seconds after playback stops.
Display
- Actual FPS: The measured frame rate, smoothed with exponential moving average (EMA) for stable readout. Color-coded based on performance:
- Green: At or above 97% of target FPS (good)
- Yellow: Between 85% and 97% of target (warning)
- Red: Below 85% of target (critical)
- Target FPS: Shown below the actual FPS. When playback speed is not 1x, displays the effective target FPS with the speed multiplier (e.g., "/ 48 eff. fps (2x)").
- Dropped frames: A counter of skipped frames during the current playback session. Displayed in red when drops have occurred.
Settings
| Setting | Default | Description |
|---|---|---|
| Position | top-right | Corner placement (top-left, top-right, bottom-left, bottom-right) |
| Show dropped frames | Enabled | Toggle the skipped frame counter |
| Show target FPS | Enabled | Toggle the target FPS line |
| Background opacity | 0.6 | Darkness of the indicator background |
| Warning threshold | 0.97 | Ratio below which the color turns yellow |
| Critical threshold | 0.85 | Ratio below which the color turns red |
Settings are persisted in user preferences and survive page reloads.
False Color and Zebra Stripes
For exposure analysis overlays including false color mapping and animated zebra stripes, see False Color and Zebra Stripes. These diagnostic overlays are documented alongside the scopes system because they operate on luminance analysis data and are typically used in conjunction with the histogram and waveform scopes.
Overlay Stacking Order
When multiple overlays are active simultaneously, they are composited in a fixed order from bottom (closest to the image) to top (closest to the viewer):
- EXR data/display window
- Matte overlay
- Spotlight overlay
- Clipping indicators
- Safe area guides
- Perspective grid
- Watermark
- Bug overlay
- Timecode display
- Note overlay
- Missing frame indicator (in Frame mode, overlays on top of the current image; in Black mode, replaces the image entirely; see Missing Frame Indicator for all modes)
This ordering ensures that diagnostic overlays remain visible above decorative elements, and that the missing frame indicator is never obscured.
Enabling and Disabling Overlays
Most overlays are controlled from individual toggle buttons in the View tab toolbar (spotlight, matte, bug, EXR window, info strip, timecode, FPS indicator, missing frame indicator). The watermark overlay is controlled from the Effects tab. Each overlay has an independent enable/disable toggle, and right-clicking a button opens its settings menu.
Overlay states are included in the session state and are preserved in .orvproject files and snapshots.
Related Pages
- False Color and Zebra Stripes -- Exposure analysis overlays
- Transforms -- Crop, uncrop, and aspect ratio tools
- Rendering Pipeline -- Pipeline stage ordering
- Session Management -- Overlay settings in session persistence
- Review Workflow -- Using overlays in dailies and review